

Introduction
Those images are ‘usual’ smoke colorized on computer. The smoke was made with incense sticks. As I was asked multiple time how I did this images, I’ll describe how I made them.
![]()
Stuff needed
Before one can start with smoke photography, one has to prepare some stuff and think about where to do it. The following things are needed:
- Camera
- Flash
- Tripod
- Lamp (Just an usual desk lamp will do…)
- Incense sticks (with holder)
- Black background (Bed sheet, book, whatever you have)
- Image editing software
- Closed room with near to no air motion, which is easy to air
- Table
- A lot of time and patience
The setup

As shooting stage I chose my living room. I created a black background with a black bed sheet. To make it really dark and to suppress light falling through I added a blanket behind it.
On that image one can see the position of the flash, lamp, incense stick and camera. During the shooting the lights of the room where turned off and thats exactly why I needed the desk lamp. The desk lamp was pointing in the same direction as the flash, therefore I could see something through the viewfinder and when I was hitting the trigger I knew that it was nearly what I saw through the viewfinder (it will never be exactly what you saw, as the time between recognizing an awesome shape and pressing the trigger is large enough for the smoke to move). Without this lamp it was to dark and I could just hope for an good shot.
The settings
Before starting to shot you should decide how you are going to freeze the movement of the smoke. Smoke is moving very fast and therefore you have either to:
a) use a short shutter speed (with enough ambient light)
b) use a long shutter speed (in a completely dark room) and freeze the action with your flash
I decided to go with a mixed way (due to the desk lamp I couldn’t go with a long shutter), I used a shutter of 1/125s and a flash for freezing the action (flash settings will follow later on).
It is nearly impossible to predict in which direction the smoke is moving, therefore I decided to go with an aperture of about 16 -18, to have a bigger depth of field.
Smoke consists of many small particles (smoke is an aerosol; a mixture of solids and or fluids in gas) and has a rough surface. Due to this fact I set the ISO to 100 to have the smoke as smooth as possible.
The settings may vary from lens to lens and with different setup, so don’t take this settings as THE correct settings. You have to find the settings which are working for your setup. Those remarks should help you to turn get good settings.For my shots I used a Sony 100mm Macro as well as a Sony 18-70mm.
Focusing was the most difficult task with smoke photography.
From other tutorials a read that one can put stuff in the smoke and focus, but it didn’t worked for my for several reason:
1) I had no mini tripod to put something in the smoke
2) I had no chance to look through the viewfinder and hold something in the smoke at the same time
3) every time I got near the smoke and set it sharp, the smoke moved somewhere else 🙂
The best solution for me, was the desk lamp. (Remark: Due to the facts mentioned above don’t even try to use the AF, it is simple too dark).
Furthermore I recognized that the correct amount of ambient light may help a lot. If it was to dark, I couldn’t see anything (even with the lamp) and I really had problems to focus. It worked much better as I tried it the next day on the later afternoon. The ambient light and the lamp were a great combination and I could see amazing details through the viewfinder.
So finally the settings of the flash. The placement of the flash is important, it has to be between the smoke and the background, pointing in direction of the camera. It is important to not have the flash inside of the image, otherwise you’ll have a very bright spot and you’ll not see much of the smoke around. If the flash is pointing to much on one side of the smoke, you may will lose a lot of details on the darker side. A position at about 1-2 o’clock should be ok.
I set the flash to 70mm (to get a narrow angle) and about 1/2 power. (As said earlier, you have to find the power value which fits for your flash / setup). 1/2 power gave me great structure without too much highlights.
The shooting
After the settings of the cam where made, lets head to the shooting.
Turn off the lights and go. Its important to close any windows and doors and to minimize movement. Every air draft will make the smoke more turbulent.
On this image you can see the intense stick, but on my images I tried to not have it in.

It is possible that you have to move the flash, as the position /direction of the smoke may change.
My shoots were made from about 3-6 feet away from the stick. Its up to you to decide whether you wanna have more details and zoom in or less details and zoom out a bit. As smaller the section, as harder it will be to catch the smoke.
In some tutorials is written that you can just trigger your prefocused cam, but I made great results using the optical viewfinder. In combination with the lamp I could adjust the focus perfectly and make some great images.
It is important to have enough time and patience, because it is very difficult to predict the movement of the smoke and you’ll have to try multiple times until you have a good image. On my first shooting the quality of the images wasn’t very good, they weren’t correctly lit or they weren’t as sharp as I’d like to have. Out of 200 images I could use about 5 (the first 4 images of the smoke set on my flickr page.)
On second day I could use about 1/3 of all photos I made. (Again about 200 shoots).
After about the half of the stick burnt away or if you have the impression that the room is too smoky, just take a break and open the windows/doors for a couple of minutes.
As there were some suspicions on the authenticity of the images, I’d like you to show an image straight off the cam.

One can really see the sharpness of the smoke, so you can see that those details were not created on computer. On the bottom right side one can see the flash a little.
When mentioning those amazing details / structure I’ve also to mention that those images were taken with and awesome lens – the Sony 100mm Macro.
Postproduction
Some words on postproduction.
At the beginning I removed the removed the spots on background and adjusted the levels to have a fully black background.
After removing the spots, I had to clean the smoke. As smoke has an imense amount of micro particles it is possible that some particles obviously brighter as the surronding particles. I just stamped away those spots.
Finally I sharped the image one sometimes I denoised it.
Orientation and mirroring
Most time the orientation doesn’t matter much, it looks different every 90 degrees. Sometimes mirroring looks awesome and other times I couldn’t get happy with mirroring. Its just a personal preference and everybody should do what he likes.
The images are now already great and some of them I really like as they are. But there are also images which got a coloring.
Color
There are several ways to colorize your images. From adjusting hue / saturation to multiple masked and colorized layers everything is possible. Sometimes it looks awesome if you invert the colors. Its really up to you, what you’re gonna try.
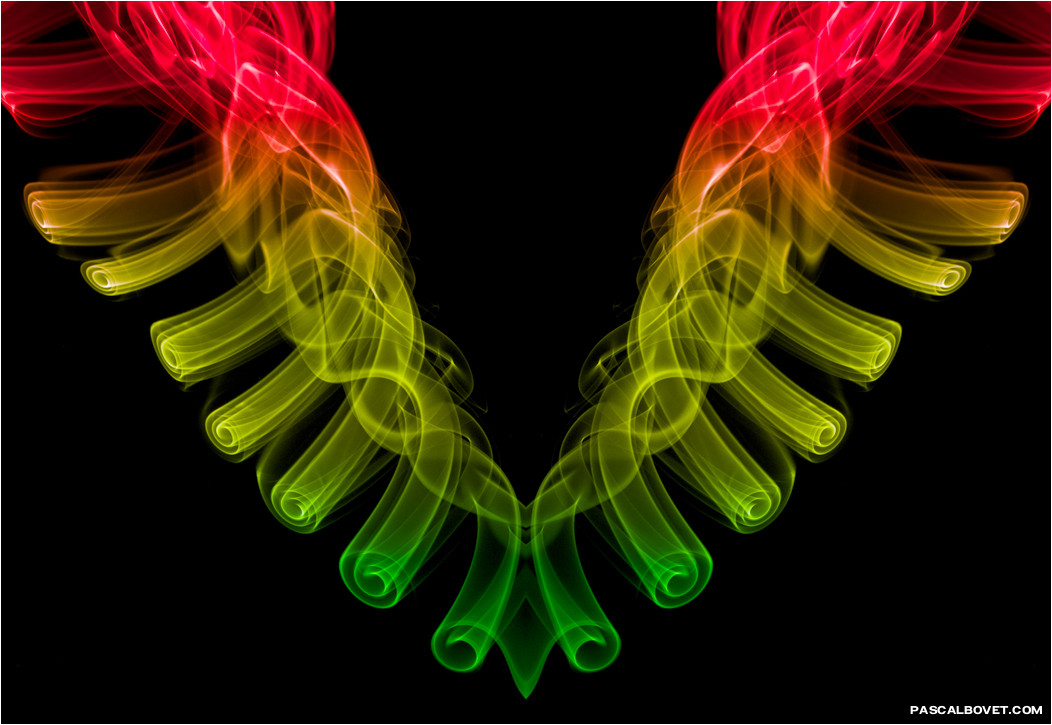
This is an image with intense coloring:
Lessons learned
Smoke photography is a great amusement and if you feel like trying something different, you surely can have a lot of fun. As smoke can be frustrating I wrote this tutorial.
Thanks
Special thanks go to my girlfriend. Those intense stick don’t smell that well if you take two or three an hour. And of course to you, the reader and all those how looks or comment on my images.
Links
My smoke set on flickr
Some of my smoke images are available at gettyimages
I was inspired by those images
http://sensitivelight.com/smoke2/
A smoke group on flickr
http://www.flickr.com/groups/smokeart/

omg, these are amazing – please translate this, so i know how you did it! :o)
Pingback: Shooting smoke - how did I do?
can I get the same results using the on camera flash?
Danke für’s Tutorial.
Zufällig beim Surfen drüber gestolpert.
😉